
Victrola Restoration (Remanufacture) Tutorial
By Jon Sheffield
After many years of restoring Victrolas and lots of trial and error, I have finally come up with the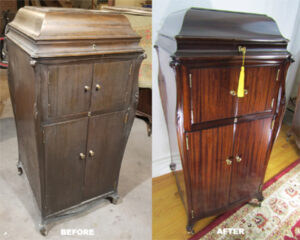 near perfect way to not only restore but completely re-manufacture a Victrola back to its like new condition. I don’t recommend this for any Victrolas that still have their original finish in good condition, obviously those have more value but are unfortunately very rare since most of the Victrolas out there when they became obsolete and were not stored properly over the years had their fragile shellac finish damaged beyond repair or in some cases completely missing in places due to using the wrong cleaning products. Victor company used very high quality and beautiful veneers in many of their Victrolas that can only be revealed in full by stripping and restoration of the finish. a damaged or contaminated shellac clear coat becomes semi opaque and will no longer show what the veneer below truly looks like, also sun damage to the color can also be a problem causing the color on the outside to be lighter than under the lid. My hope is that with a fully restored Victrola, it will be taken better care of this time around and in another hundred years or so will once again regain the patina and gently aged finish it could have had if it has only been take better care of in the first place.
Also, the spring motors in most cases have grease that is typically dried up and can only be restored by disassembly, cleaning and restoring the lubrication. Victrola also used top quality parts in their motors and after rebuild will run as good or better than when new. More on the motor rebuilding process here.
Here are details on the re-manufacturing process I use for all my restored Victrolas and other antique phonographs that require full restoration. I am not going to go into all the necessary safety measures needed so if you are a novice, please read and take all the necessary precautions when using power tools, paint stripper, lacquer and other dangerous tools and chemicals and proceed at your own risk. I have acquired all the tools, chemicals, parts and other special gear needed to restore these properly. If you don’t have the space, tools, skills, etc. I don’t recommend you do this yourself.
Tear Down:
The first step is to carefully disassemble and store all the parts and fasteners (screws & bolts). I have found that if you do this in an organized way, re-assembly can be much easier. I use a Dewalt 8V motion activated electric hand held screw driver with a small flat head bit to remove screws as there are a lot of them.
I also put the screws, bolts etc. into small plastic containers with lids and label each one with what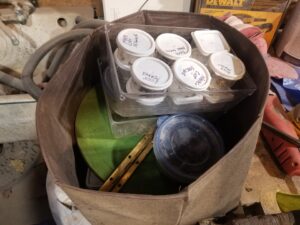 they are. When finished stripping down, there should be no metal screws or parts on the doors, lid or chassis except the screws that hold the chassis together. the only exception is the motor board and the tone arm assembly, those are removed but disassembled later. Remove the horn and record rack if the unit has one and set aside.
Castors
Restoring the original castors can be done if you prefer to keep them, be prepared to spend some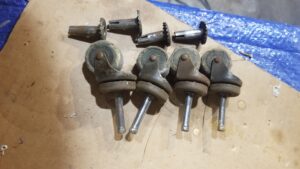 time but in a lot of cases, they are no longer round with no way to correct that. I think hard to roll or stuck castors may be the cause of some feet breaking off or legs cracking due to the extra stress. Also, the sleeves are most times rusted out making the castor loose and easily
 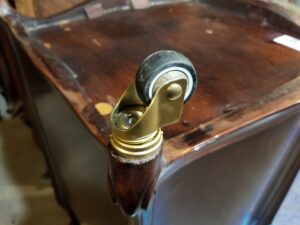 falling out. Since the original castors are normally in very bad shape, I typically discard them and replace with a modern castor with rubber wheel I found that is very similar to the original. it has bearings to help rotate and works very well.
Next, remove the castors, pry out the sleeves. remove the brass rings and put in small container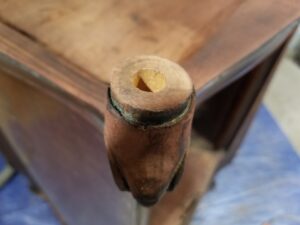 with other parts. Clean the holes well using a vacuum and then drill out using a 3/8″ Bit, put a piece of painters tape on the bit to mark how deep to drill. The drill depth will be slightly longer than the castor post length. I then sand the leg end flat and clean up sides removing the finish with the 5″ round sander with 180 grit sandnet sander.
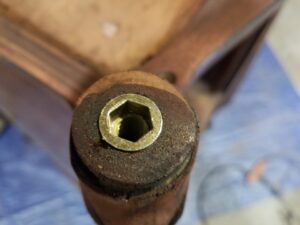
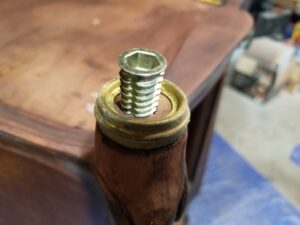 I use a 3/8″ hex driver to screw the castor threaded sockets into place until they are flush with the leg bottom. I then screw in a temporary set of castors since stripping and refinishing will sometimes get on the castors, putting in fresh ones after restoration is best.
 The trim rings are not installed until final assembly when the permanent castors are installed to avoid getting the rings fouled during finishing cabinet.
Restoring the bottom
Since most of these have been stored in basements or in otherwise less than ideal conditions, the bottoms are typically in bad shape. I have seen water damage, mold and in once case, the bottom had buckled due to the weight of the records stored inside. Sand the bottom with 120 grit 1/4 sheet sander until fresh wood is shown. Hand sand any areas the sander cant reach. Add a small glue run around the inside corner all the way around to help reinforce the side and bottom connection, I use
 carpenters wood glue. Fill any holes using 2 part wood Bondo. if bottom of sides are not together tight, (they are like plywood and can come apart if water damaged), then add carpenters wood glue using putty knife to get in-between the separated ply layers and use clamps to set. Lightly sand again next day when all fills and repairs are dry and use same wood dye (will explain more later) as will be used for the rest of the project. To protect in case some day in the future the Victrola is stored in a basement or less than ideal location again, next day put heavy coat of semi gloss Minwax polyurethane to seal the bottom. Let dry and apply another coat if necessary.


Stripping the old finish

Flip the unit back onto its temporary castors with a blue tarp underneath, The next step is to chemically strip the old finish. To do this, I use Jasco Paint and Epoxy stripper, seems to work the best. I pour into a small baking pan, apply with a disposable chip brush, wait around 5-7 minutes or until it looks like it is dry in spots, apply another coat, wait a few more minutes and then scrape with a plastic putty knife. Typically takes 2-3 times to remove the finish. I am only removing the clear coat (shellac), the color coat is removed later.
I scrape the finish off and put in a disposable can with a lid. I typically start with the doors (front and back), then the top (typically outside only) and finally the main chassis one side at a time laying it on its side and flipping over as I go. After I strip the finish,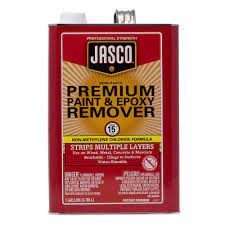 I immediately afterwards use Kleen Strip denatured alcohol and cotton terry wash cloths to wipe down the piece and get off the stripper and any shellac finish left. if some spots of shellac are still on there, it comes off with the next step. Getting off most of the clear coat is best to reduce the amount of sanding required. For the carvings, I add stripper one or more times and lightly scrub with a stripper brush to remove the finish from them. This step is important so the carvings are not darker than the rest of the finish. You can tell on other restorations that this was not done as all the carvings are typically much darker than the rest of the unit. The ultimate goal is to have the entire unit a consistent shade of the final color, typically matched to the color under the lid.
Sanding color coat off and removing light scratches
The next step after stripping and letting dry for a day is the sanding process, this is one of the most important steps and can be the most time consuming depending on model and complexity. Victrolas with lots of flat sides and little carvings are the easiest, the others like the XVII and XVIII and others like them can be more challenging. I typically start by sanding the doors on the bench using a flat sander and 120 grit 3M sand paper on a 1/4 sheet flat sander.
This takes it down quick so a light hand is needed. I only sand the tops and bottoms with the  electric sander and do the more delicate sides by hand. After removing the color and light scratches with the sander, I clean off with a Vacuum with brush attachment. I then inspect the piece for any dings or scratches that wont sand out and use stain-able wood filler mixed with some of the sanding dust collected from the sanding and a small amount of the dye or stain that will be used on this unit. I apply with a putty knife. After this dries for at least an hour, I re-sand the entire
 door using 220 grade 3M sand paper with the electric sander and hand sand the edges to prep for the dye coat.
Sanding color off of the carvings is an important step in making the unit color look uniform. I have seen many restorations where the carvings have been left untouched and end up being much darker than the rest of the unit making it look obviously restored. It is things like this that make the difference between a finely detailed restoration and a mediocre one.
Getting the color out of the carvings without sanding the detail off is possible and just takes some extra time, care and careful work. I typically use an extra coat of stripper on the corner and edge carvings and brush them with a stiff plastic bristle brush to remove as much finish as possible. I wash them down with alcohol and after allowing them to fully dry, start on the sanding. I use 1/4 sheet of 120 grit cut into thirds and folded in half. Starting at one end of the carving and working my way to the other end, carefully sanding out any remaining finish without sanding down any detail. Here are pictures that show the before, during and after.


Sanding the Top & Restoring Top Underside
Sanding the top is similar to the doors, electric sander with 120 grit for the flat top and hand sand the sides and edge. I sand finish off all the way to and including the flat edge underneath where the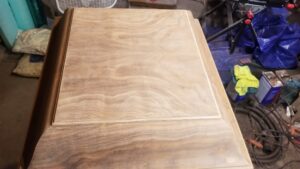 hinge attached and all the way around, being careful not to sand any of the inside of the top. Sand the entire top again with 220 and dust off. Flip the top over, for the inside of the top I use 400 grit 3M sand paper and the 1/4 sheet sander and lightly sand off as much of the shellac clear coat as possible being careful not to sand thru any of the color coat. If I do accidentally sand thru, I touch up with dye. For the sloped sides of the inside I also use a combination of the electric sander and hand sanding. Hand sanding will also be needed to get the corners and edges of the inside.
Sanding over the label is tricky but can be done without damaging it if you are careful. The Victrola logo existing clear coat needs to at least be scuffed so the new clear coat can be applied correctly. I have seen other restorations and tried it myself without luck, but sanding all the color coat off except around the logo never comes out good and is almost impossible to match the color, the logo area always looks darker and is easy to spot.
The best way is to either scuff sanding as much of the original clear off under the lid being extra careful (hand sanding) over the logo and then restoring the clear coat (described later) or fully sanding the inside all the way to raw wood and replacing the Victrola Logo. Fully stripping and restoring under this lid is a little more work but will guarantee the color matches inside and out . Keeping the original Victrola Logo is also a good practice if it is practical but there have been times when the finish was to badly gone under the lid (cracked, deep scratches etc) and I had to completely sand it. I found an exact duplicate of the original Victrola logo on eBay, made in Peru and very good quality. The cost of a replacement decal is around $25, shipping is slow but it looks great after final finishing. Here is link to the replacement decals I currently use. Prior to applying the decal, fully sand the entire unit to 220, spray the dye on, spray the sealer coat, then two coats of clear lacquer under the lid before applying the decal. the remaining coats are added at time of final finishing and are first dusted over the decal, the heavier coats with 400 hand sanding between every 2 coats until the finish is flat.
After you are finished scuff sanding the inside or fully sanding for new logo and the outside is sanded to 220 grit. Vacuum out the dust and set the top aside.
With the doors and top sanded, the last and in most cases (depending on the model) the most difficult is sanding the chassis. For most models with flat front, back and sides, the 1/4 sheet sander with 120 grit 3M Pro Grade Precision sand paper works best for the flat areas. For other models like the XVII and XVIII, sanding is more difficult and much of it requires hand sanding. All the curved areas around the top and corners require hand sanding. Once again, sand the flat areas, corners and top area with 120 and cutting a 1/4 sheet of paper into 3 smaller pieces for sanding the corners. Take extra care in lightly sanding the carvings to remove as much existing finish as 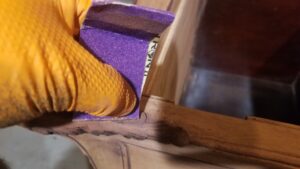 possible. The corners and top area are made of softer wood and sanding needs to be done with care not to sand down any of the detail. Getting finish out of the cracks and crevices can be done by bending the small piece of sand paper in half and using the bent edge to sand out finish. Prepping with sanding is the most difficult part of the restoration but makes the most difference on the final restoration. For the inside storage area, the record rack should already be removed during tear down, wipe down the inside using a damp cloth, scuff sand the bottom of the shelf and bottom of the unit. if the shelf has a lot of scratches, sand the finish off with 120, then sand to 220 so it can be finished with the rest of the cabinet.
Veneer Repair
After sanding the entire unit to 120 grit, the doors, top and chassis needs to be inspected for loose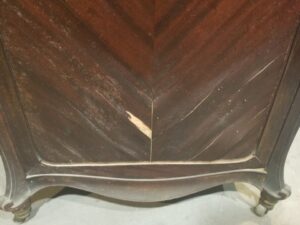 or missing veneer. Since most Victrolas are done with stripped mahogany, replacement veneer for patching or replacing sections can be picked up at a local Woodcraft retail store, others like Walnut, Oak etc may need to be sourced thru online veneer retailers. Also, inspect the piece for any dings or scratches that didn’t sand out and use stain-able wood filler mixed with some of the sanding dust collected from the sanding and a small amount of the dye or stain that will be used on this unit. I apply with a putty knife or some cases with my fingers. Don’t bother sanding at this point because the entire unit will be sanded with 220 after final veneer repairs and prior to applying the dye coat.
Patching and Loose Veneer repair:
At times, especially when a Victrola has been stored in a moist basement or other area, since the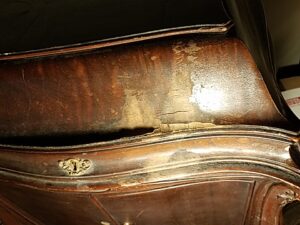 veneer was originally installed using hide glue, water will cause it to lift in some areas that were wet or near moisture for some period of time. I use Titebond cold press veneer glue for repairs and veneer replacement. I use a product called Veneer Tamer to make replacement and patch veneer flexible so it wont crack if not applied to a flat surface.
To repair loose veneer, I carefully lift the veneer and start at one end and work to the other doing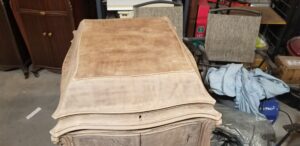 one section at a time applying the glue under the veneer and spreading it with either a putty knife or if access is available, I use a chip brush to even it out. For missing pieces, I try to match the patch piece to grain of the area, cut to size with scissors or razor knife. Cut the patch larger and re-cut until it fits. The next step is critical to a good veneer repair,
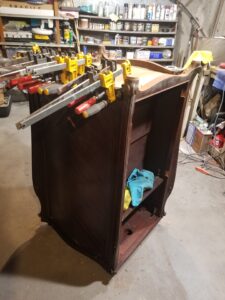
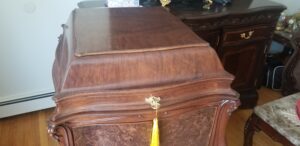 you must either clamp or use weight to hold it veneer down until it set, I typically wait 24 hours. For flat pieces like doors, I use two pieces of white laminated 5/8″ shelves purchased at Home Depot that are around 24″ x 14″. I then use clamps all the way around, typically Bar clamps
 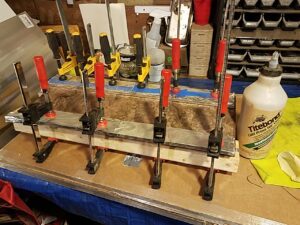 and spring clamps. For areas where I am not able to clamp (like shown below), I use thick gauge aluminum sheet metal cut to size with tin snips. I place the cut sheet metal over the repair area using wax paper between and clamp or use weights and clamps to hold down until the glue sets. After waiting a day, I remove the clamps, etc. and sand the entire unit; top, doors and chassis again using 220 grit to prep for the dye coat. The 220 sanding goes much quicker than the rough 120 sanding and can be completed fairly quickly using 1/4 sheet sander and by hand on corners and trim using 220 grit 3M Pro Grade Precision dry/wet sandpaper.
Color and seal coat, grain filler & Motor tear down
Next is to cover the label on the bottom of the motor board for protection against damage. Strip the top and sides of the motor board with Jasco stripper, typically takes 2-3 strip cycles. Then, wipe down with Denatured alcohol, let dry several hours or overnight and then sand with 120 and again with 220, dust off and set aside.
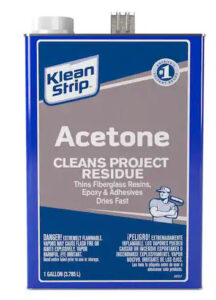
Color Coat: Now at this point all the pieces; top, chassis, motor board and doors should have all veneer repaired, scratches sanded out or filled and be sanded to 220 grit. For color coat I use Mohawk Ultra Penetrating Non Grain Raising Dye Stain. I color match to the color under the lid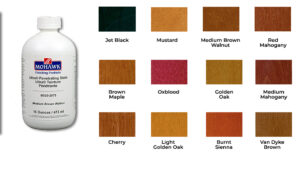 before removing the color, I mix them in some cases to get a better color match. The secret to using dye is to dilute it with Acetone (read caution on can, vapors and flammable) and apply it until it reaches the correct darkness and depth, starting light and getting darker until it reaches the correct darkness that matches the under lid shade. You cant go back if you make it to dark so start light and apply it until it is the correct darkness.
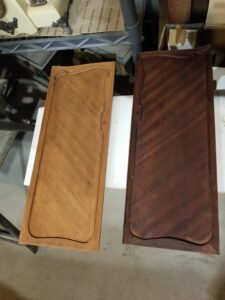
 Applying the dye is more difficult than regular stain due to streaking and consistency but really makes the grain pop as opposed to stain. Stain I have found, especially with walnut, makes the wood look more “painted” whereas the dye enhances the grain and really makes it stand out without covering it up. See the comparison of a XVIII someone else restored, most likely using stain instead of dye, as shown it looks more painted than stained and my restoration of a different XVIII using dye.
Some parts, especially the trim will soak up the dye quicker than other areas like the veneer, be careful to apply diluted and to not go to dark. The Dye can be wiped on using a cloth towel but streaks can be a problem on the larger pieces like the sides. I typically use a cloth towel for the doors, top, corner trim and add coats until it is the correct darkness. when I dye the top of the chassis, I put the motor board in place so it comes out the same shade as the rest of the top area.
For the sides in order to not get streaks, I use my Fuji Spray gun with a 1.3mm needle, adding coats until it is the correct darkness and matches the under lid depth and color. I typically let the dye dry overnight before proceeding with the next step.
Seal Coat and Grain Filler
After applying the dye coat, the next step is to apply the sealer coat. I was using Zinsser Bulls Eye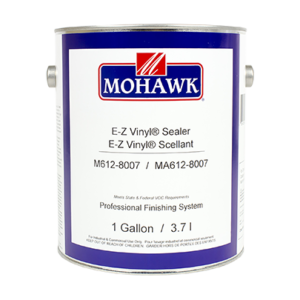 Seal Coat – Dewaxed Shellac for this but have recently switched to Mohawk EZ Vinyl Sealer. I spray on the seal coat being cautious not to go to thick with the coat but enough to cover fully all areas. Putting on the seal coat to thick will cause problems with the grain filler filling so one or two thin coats are preferred.
I let this dry for a day before proceeding to the next step, Grain filling. The Grain filling step can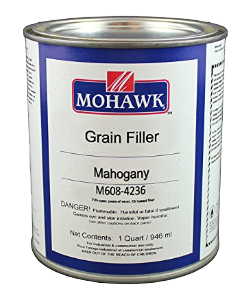 be messy and takes some work but will save a lot of clear coat and sanding in the long run. I have had good results with Mohawk premixed Mahogany and Walnut grain fillers. I use Mahogany grain filler for Mahogany and cherry finishes and Walnut Grain filler for Walnut and sometimes Oak.
The grain filler only fills the grain and does not color the unit, since the dye was locked in with the sealer coat, the grain filler should only fill the grain. I do light sanding with 400 grit to knock down any areas of the sealer coat where it went on to thick or has imperfections like bubbles or runs. be careful not to sand thru the seal coat. I start with the doors on the bench, applying grain filler (consistency of pancake mix) to the doors with a chip brush, wait until it dries around 10-20 minutes (it starts looking dull) and then use a plastic putty knife to scrape it going against the grain. Don’t let it dry to long or removing it will be difficult. getting all the grain filler off without lines can be tricky but will save some labor later after it dries.
Do this to both sides of the doors, the top, and lay the chassis on its side and do the sides and trim. for the trim, and areas that aren’t flat, I just let it dry a little and wipe off with a wash cloth being careful not to wipe it out of the pores. After applying the grain filler to the top, doors and chassis, i typically let everything dry for a week. It might take less time but it needs to be very dry to sand the lines out or else it just smears them around. After it has dried for a week or so, use 400 grit to sand out any lines left from scraping.
Motor Tear Down: While the grain filler is drying, now is a good time for addressing the motor board that was pulled out during tear down and set aside. For this step, I normally start by removing the speed indicator assembly, then the governor assembly, the main drive worm gear and then the spring barrels. I use the same small plastic containers with labels for all the parts and keep separate from the other containers used on the main tear down. I leave the governor assembled and address it’s rebuild later. Everything should be removed from the motor board including the speed indicator dial background. I use a plastic 5 gallon bucket with lid to put in the larger parts for a soak; main drive gear, motor chassis, spring barrels and covers and finally the springs.
To get the springs out, I open the spring barrels and make a sketch of the way the springs are wound (clockwise, counter clockwise). spread out a disposable blue tarp on the floor, put cotton work gloves and grab the inner end of the spring with pliers to pull out and carefully start unwinding the springs out of the barrels, slowly, steady and carefully. After I pull out the springs, I give them a quick scrape over the garbage to remove excess dried grease, set aside and do the next spring. After scraping the spring barrels and other barrel parts and putting them in the bucket, I then make the springs smaller by winding them in my hands and place in the 5 gallon bucket on top of the other motor parts (putting the springs in last). I then pour 2 gallons of mineral spirits into the bucket and put the lid on it securely. I have been re-using the same mineral spirits and just letting the solids settle between jobs so it pours semi-clear. I set the bucket aside for between a day to a week and shake it occasionally. Now that the motor board has everything removed, I typically use 120 grit on the 1/4 sheet sander to remove the clear and color coat, skipping the chemical stripping. Main reason is so I don’t get stripper on the underside of the motor board to damage the label and simply to save time, the flat motor board sands quickly. After sanding off the finish, use 220 to prep for color coat. Apply dye and put motor board in place to make sure it is the same color depth of the inside top and correct as necessary. I typically skip the grain filler on the motor board and just fill grain by building up the clear coat.
Applying Clear Coat
Now that the grain filler is dry with lines sanded out and the motor and motor parts are soaking in mineral spirits, the next step is to start applying the clear coat to doors, top, motor board and chassis. In addition to getting the correct color and color depth, getting the correct sheen is also important. In some cases semigloss is not glossy enough and gloss is to much, I typically mix the two until I get the correct sheen. When these 16, 17 and 18 model Victrolas were new, they had a fairly glossy hand rubbed finish so getting something close to that is typically the goal. The gloss under the lid can work as a guide.
The clear coat has been the biggest challenge to get right, it has taken a lot of experimenting and practice to get a result that I was satisfied with. I first started with Deft semi gloss lacquer, those units were a little to dull, then I mixed Deft Semi gloss with Old Masters semi gloss 50/50 and got a near perfect sheen, unfortunately getting Old Masters semi gloss lacquer has proved a challenge so I have now switched to Mohawk finishers choice semi gloss lacquer with Mohawk Smooth Coat lacquer for the final coat. I use the same Fuji spray gear as shown above with a 1.3 needle for the clear coat.
A major problem I ran into constantly was fish eye due to silicone contamination, it seems a lot of people tried to restore the ruined shellac finish on their Victrolas using polishes that had silicone in it. Once that gets into the wood thru cracks in the clear coat, the new lacquer will get craters in it that usually don’t show up until the 2nd or 3rd coat. I have had to strip down and start over because of this problem causing major extra work. I used to scrub down the bare wood with TSP and other products to try remove the contamination but it almost always showed up somewhere making the final less than perfect. I am a protectionist so this was not acceptable. I had read that if you start using a silicone additive that it contaminates all your equipment and you can never go back so I was reluctant to try it. I finally gave in and for restoring antiques it was one of the best decisions I have made. I use 3M Marson Smoothie Fish Eye eliminator and have not had a problem since.
I typically add the Marson Smoothie Fish Eye Eliminator the the entire gallon in the amount shown on the directions. The Lacquer Mix I use is 10% Mohawk M716-5007 Flash Off Control Solvent, 20% Lacquer Thinner & 70% Mohawk Buffcote Satin 60 Sheen with the recommended amount of Marsons Smoothie Fish Eye remover. The the last coat I use 10% Flash Off – 30% Lacquer Thinner & 60% Mohawk Buffcote Lacquer in Satin 60 Sheen and Marsons Smoothie Fish Eye Remover. If the humidity is high, i sometimes add a small amount of Mohawk Retarder to prevent blushing.
I start spraying with the back cover door, lay it on a spray stand I made that has (2) two by fours runners to hold the work while I spray. I use two explosion proof exhaust fans on high, a 3M vapor mask with 3M 6001 Organic Vapor Cartridges and wear a White Disposable Micro-porous Coveralls with Hood. There are a lot of safety protocols to follow when spraying lacquer, only attempt this if you have the correct ventilation and safety gear. This is not an article about proper safety guides so please do your research before attempting this or any of the steps outlined in this article. I start by spraying the sides and then the top with a medium wet coat. I use stand similar to the spray stand for drying. Next I spray one side of the doors, starting with the sides and then top and then same for motor board. The top is a little different. I start by spraying the outer edge, then each side starting at the bottom and spraying the edge of flat portion of the top itself. once i finish with the sides, I fill in the flat part of the top starting at one end and working my way to the other. Take care spraying the sloped sides as to not spray to heavy as it will cause sags easily. The inside of the top is not worked on until after the fist scuff sanding. For the chassis, I lay the unit on its side using cushions to support both ends. I start at the bottom spraying, then up one side, across the top then back down the side. After this I spray the flat part of the side starting at one side and working my way to the other spraying a medium wet coat.
Let dry for a day, spray the other sides of the doors and flip the chassis to the next side, typically the back (not laying it on the side that was sprayed the previous day), wait a day, flip to the next side, spray and then after all sides, front and back have their first coat, I stand up and spray the top area inside (the outside of the top should have been sprayed with the sides).
After everything has been sprayed with its first coat and dried for a day, I sand everything with 400 grit sand paper starting with the orbital sander for the large flat areas and hand sanding trim and other non-flat areas to scuff and sand out any imperfections.
I use a Dewalt 5 inch random orbital sander using Diablo SandNet 400 grit sanding discs, these seem to work best with the orbital sander on its lowest speed. I use the sander on all flat or sloped areas but for trim, door edges & sloped part of top, I do that by hand using 3M pro grade wet/dry 400 grit sand paper. a 1/4 sheet of sand paper folded over and cut into thirds works best for trim. Sanding between coats is necessary if you want a perfect finish without any grain, sags or other problems to show thru. If I accidentally sand thru the color coat on an edge or other area, I touch up with diluted dye. At this point when everything had its first coat of lacquer and has been sanded, I start working on the inside of the lid.
For the inside of the lid, as described earlier, it should be sanded with as much of the shellac coat off as possible without sanding into the clear coat. If there are any areas where it was sanded thru or a defect or problem with the original stain, I touch up with dye. Since the inside of the lid is shellac based, spraying lacquer is to “hot” to go over the shellac and will cause or can cause problems like orange peel, bubbles, etc. The best method and a controversial one at that is to go over it with semi gloss polyurethane, the same Minwax poly that was used on the bottom to seal it. Polyurethane goes over the original shellac without any problems and makes the inside of the lid look much like the outside when completed. The secret is to apply it only on horizontal surfaces.
I put the lid up on its side so the inside of the lid side I am working on is flat and completely horizontal. I lean the lid against a surface and use a screw or some other fastener on the work bench to stop the lid from slipping down. I apply a light coat of well mixed Minwax semi gloss polyurethane to that side that is flat. check for any runs down the edge and make a straight line where the side meets the inside flat part of the top. Let dry overnight, flip to the next side, another light coat, keep doing that until all 4 of the inside sides are completed. After that, lay completely flat and apply another light coat to the inside flat part of the top. After that dries overnight, inspect it to see if it looks satisfactory, if not, sand completely with 400 and repeat the process.
I repeat the clear coat spray and sand cycle for 3-4 coats or until I don’t see any grain showing thru. Depending on the unit, sometimes after the final sand with 400, I spray the chassis, doors and top using Mohawk Buff Coat lacquer for the final finish coat.
Motor Rebuild, Parts Cleaning & Polishing
After the clear coating is finished, I have found it best to let the unit cure for a week before re-assembly in order to not damage the clear coat before it has time to harden. If you are rushed, it can be reassembled in a couple of days but I typically wait a week. While it is curing, I use this time to work on the motor rebuild and parts cleaning and polishing.
Motor Rebuild
I start the motor rebuild by opening the 5 gallon container the large parts have been soaking in mineral spirits in and unloading it the opposite as it was loaded. I fill a utility sink with warm water and concentrated Dawn liquid soap for dissolving and removing the remaining grease. I put the springs one by one in the sink, clean with a sponge, rinse and hang up to dry. I do the same for all the larger parts, gears, spring cans etc. I use 0000 steel wool on some items to remove corrosion or stubborn grease. I also us a soft brass wire brush on all the gear teeth to remove any dried grease from their teeth. After everything is removed from the bucket and cleaned, I pour the mineral spirits back into their metal cans and re-cap. I use a pick to remove the ball bearing from the chassis where the main drive worm gear inserts. The bearing gets replaced so the one that comes out is just for verifying size.
The next step is to work on the governor. I fully disassemble it, including the weights. I clean and polish the weights, governor worm gear, brass disc and all other brass parts get scrubbed with the 0000 steel wool until they are bright.
The next step is to restore the governor worm gear ends and the main drive worm gear end. With wear and age, the ends of the governor and main drive worm gear get cupped where it contacts the ball bearing. I use a fine stone on the bench grinder and carefully grind a very small amount of metal off the ends, only enough to remove the cup. I then polish the ends on the bench grinder polisher. By doing this, it lets these shafts ride on just the very apex of the ball bearing with less friction. Some ends have larger and others smaller cupping depending on how much use that unit got.
After reassembling the governor, I work on cleaning all the other smaller parts that are in the containers one by one using the steel wool and dawn soap to polish any of the brass parts and clean any corrosion off or foreign material any other parts. The door pull knobs are cleaned using steel wool and dawn soap and leaving the bolt in them to make them easier to hold onto. The hinges all get scrubbed and polished with the steel wool and dawn soap. The larger bolt heads with gold plate get a light scrubbing. for the rest of the screws, I use the bench grinder with a soft wire brush to lightly brush the heads of all the screws for the chassis and motor, this makes them look new again. I put all the hinges, knobs and other parts for the chassis (still separated into small containers but cleaned) onto a separate tray.
For the motor chassis, some I send out for sand blasting, others I tape off the chrome accents and all holes and hang up for paint, I use Rust-Oleum metallic nickel satin spray paint to put a light coat on the chassis to make it look bright again. The chassis should be completely de-greased and any areas where gears or shafts go covered with painters tape.
The motor parts are then put out to start the motor reassembly. I start by re-installing the springs back in the cans using the chart I made when i removed them (clockwise-counter clockwise etc.). After the first sprint is installed, I pack it full with Amsoil Synthetic Polymeric Off-Road Grease, NLGI #2 with Moly. This works better and lasts longer than any other grease on the market. I use Mobile 1 full synthetic grease for all the other moving parts and gears.
Tone Arm Restoration
(to be continued)